ICT Unicorn Model — Breaker Block + FVG in One Spot
The ICT method is full of standalone entry zones: Order Blocks, FVGs, breakers, rejection blocks. Each of them works — sometimes. The real jump in quality begins where two independent zones point to exactly the same place. The Unicorn Model is the most famous such confluence: a Breaker Block overlapping a Fair Value Gap. Structure confirms the imbalance, the imbalance reinforces the structure — and the intersection of the two zones becomes one of the most precise entry locations in the entire ICT arsenal. The name is no accident: such a formation, fresh and in the right context, shows up about as often as a unicorn. In this article we learn to find it, validate it and trade it.
What the Unicorn Model Is
The Unicorn Model is the overlap zone of two PD Arrays (price zones from the PD Array Matrix): a Breaker Block and a Fair Value Gap. To understand why this pair is so strong, let's recall what each component brings.
The Breaker Block is an Order Block that failed — and became valuable precisely because of it. The sequence: the market sweeps liquidity (e.g. breaks a high), then breaks structure in the opposite direction; the Order Block that "should have" held price gets run through and from then on works from the other side — as support or resistance of flipped polarity. The breaker carries structural information: a sweep and a genuine change in the direction of price delivery happened here. The full lecture is in the article on the Breaker Block.
The Fair Value Gap is a three-candle imbalance gap — an area price flew through one-sidedly and tends to revisit in order to rebalance the valuation. The FVG carries imbalance information: the market left an inefficiency here that acts like a magnet for price. The basics are in the article on the FVG.
Each of these tools on its own gets retested, run through, ignored. But when a fresh breaker and a fresh FVG — both created in the SAME displacement leg after the SAME sweep — overlap, you get a zone backed simultaneously by structure and imbalance. It's like two independent measurements pointing at the same spot: the probability that price reacts exactly there rises clearly above either tool alone.
Validation requires three elements: a break of a swing high/low (the structure shift), a Breaker Block formed on the broken swing, and an FVG overlapping that breaker. The intersection — and only the intersection — is the entry zone. The bullish Unicorn forms at the end of a down move: a lower low → higher high sequence, bullish breaker + bullish FVG, long entry on the retest of the overlap. The bearish Unicorn — mirrored, at the end of an up move: higher high → lower low, bearish breaker + bearish FVG, short entry.
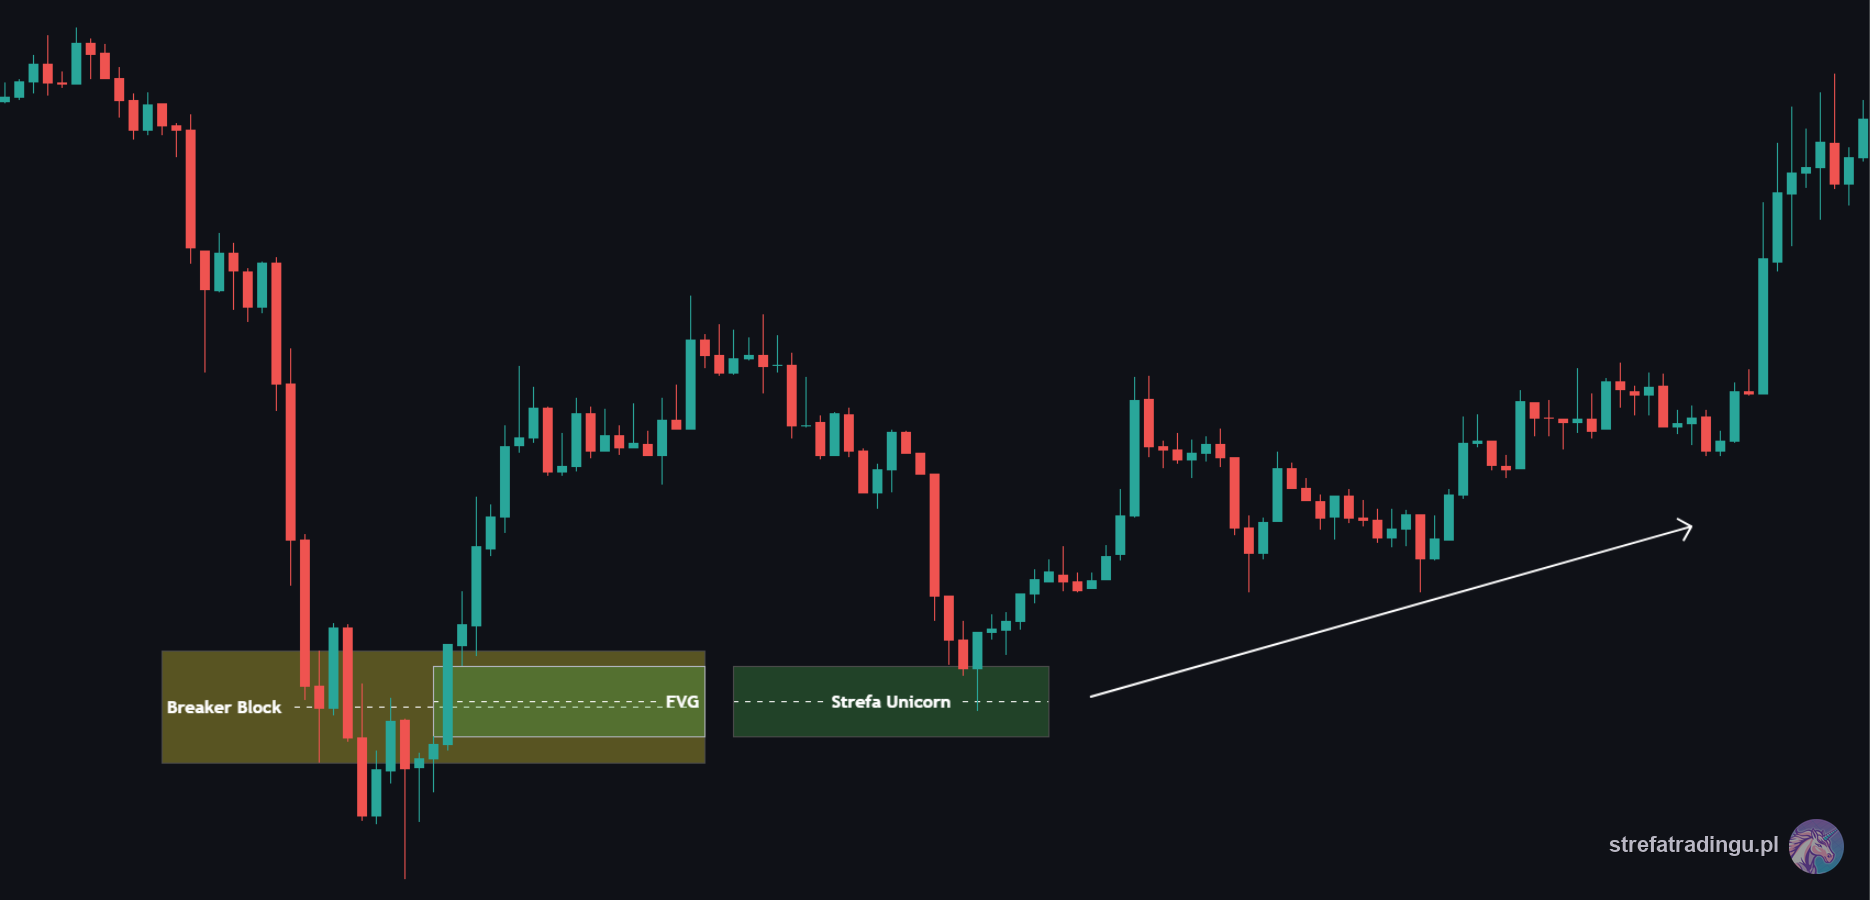
Setup Conditions Step by Step
The Unicorn is an execution tool, not a standalone strategy — it needs higher-timeframe context. The checklist:
- Set the day's bias on D1/H4. Unicorns aligned with the bias convert incomparably better than ones traded against it. Counter-bias only with a very strong HTF reason.
- Mark the HTF zone where the market may turn — an Order Block, FVG or another zone from D1/H4/H1, in the right part of the range (discount for longs, premium for shorts).
- Wait for price to reach that zone. Without a tag of the HTF level there is no unicorn hunt — only lower-timeframe noise.
- On M15/M5, watch for the sweep and the MSS in the direction of the bias. That structure shift creates both components of the setup at once.
- Mark the Breaker Block — the Order Block run through by the structure-breaking leg, at the level of the broken swing.
- Check the overlap with the FVG. The gap must come from the same displacement leg and physically intersect the breaker. No overlap = no Unicorn. A lone breaker is still a tradable setup, but a different one — don't call it a unicorn and don't size it like one.
- Mark the intersection of the two zones. That — and only that — is the entry zone. Our SRL indicator draws FVGs and breakers automatically, so overlaps are visible immediately, without manual rectangling.
- Wait for the retest. You don't chase the displacement leg; the entry is on price's return to the overlap.
- Stop beyond the candle that created the FVG — below its low (long) or above its high (short), with a buffer; that candle sometimes gets retested by a wick.
- Target: the nearest draw on liquidity — equal highs/lows, the previous swing, the HTF zone in the direction of the trade.
The Unicorn vs a Plain Breaker and a Plain FVG — What the Overlap Really Buys You
It's worth understanding exactly what the confluence gives you — because it explains both the model's strength and its limits.
A plain breaker retest has one weak point: price often shoots through the zone by a handful of ticks, tripping tight stops before it reacts. A plain FVG has a different one: a gap without structural context often simply gets filled and ignored. The overlap patches both holes at once. The breaker says "structure flipped here", the FVG says "the market left unfinished business here" — and the intersection narrows the entry zone to the area where both conditions hold simultaneously. A narrower zone means a tighter stop with the same invalidation logic — better RR geometry by construction.
The second benefit is psychological and often underrated: the overlap forces selectivity. The "no FVG = no Unicorn" criterion works as an automatic quality filter — it cuts out most mediocre breaker retests that look tradable one by one but wreck the statistics in aggregate. Fewer trades, but each with a better justification.
A third thing to remember: the hierarchy of the components. If the zones only partially overlap, the entry is exclusively the intersection — not the full span of both zones. If the overlap additionally contains the 50% level of the gap (Consequent Encroachment) or the OTE zone from the same impulse, you have a triple confluence — those are the formations that give the cleanest reactions. But beware the reverse trap: piling on extra "arguments" to justify a trade you already want to take is not confluence, it's rationalization.
A Worked Example on ETH
Bias: bullish — D1 in a structure of higher lows, and after a three-day correction price reaches a bullish H4 Order Block in the discount zone (3,050–3,110). The context is ready; now we wait for the low timeframe to show its hand.
5:30 AM ET: ETH sweeps the local M15 low of 3,072 and dives to 3,041 — inside the H4 zone. Sell-side liquidity collected.
6:15 AM ET: a full-bodied bullish candle breaks the last lower high at 3,095 on M15 — MSS to the upside, with clear displacement. The breaking leg: (a) runs through a small bearish Order Block at 3,078–3,090, turning it into a bullish breaker, and (b) leaves a bullish FVG at 3,070–3,088.
Validation: breaker 3,078–3,090, FVG 3,070–3,088, intersection 3,078–3,088. The sweep happened, structure broke, both components come from the same leg. Unicorn confirmed.
7:40 AM ET (entry): price pulls back into the overlap. Long at 3,083, stop below the low of the FVG-creating candle (3,038), target at the 3,205 equal highs, just under the H4 HTF zone.
New York afternoon: the session delivers 3,205. RR around 1:2.7. Notice how many times in this scenario we did NOT trade: not on the sweep, not on the MSS, not on the breaker alone — only on the retest of the spot that two independent tools pointed to at once.
And one more honest note: had the retest never come — and that happens, because the strongest moves can run away without a pullback — there simply would have been no trade. A missed opportunity costs zero. An entry without a plan can cost far more, and no confluence changes that.
Common Mistakes
- Calling a lone breaker a Unicorn. The model's entire value lies in the overlap of two PD Arrays. A breaker without an FVG is an ordinary breaker setup — different probability, different sizing.
- Gluing together zones from different contexts. The FVG must come from the same displacement leg as the breaker. An old gap that happens to hang at the same price doesn't create a Unicorn — it creates the illusion of confluence.
- Trading against the bias. Counter-bias unicorns wreck the statistics fastest. The HTF filter is part of the setup, not an option.
- Entering without a retest. Jumping into a position mid-displacement "so it doesn't get away" means entering at the top of the impulse with a mile-wide stop. Retest or nothing.
- A stop glued to the zone. The FVG-creating candle sometimes gets pricked one more time. Stop beyond its wick with a buffer — on crypto measured in ATR.
- Forcing the setup every day. The unicorn is rare by definition. If you're "finding" one three times a day on M1, the market isn't being generous — your criteria are too loose.
The Unicorn Model is the best illustration of what edge in the ICT approach really means: not finding magic formations, but stacking independent arguments in one place and one time. You'll learn the foundations of this confluence in the articles on the Breaker Block and the Fair Value Gap, the signal that ties it all together in the piece on the Market Structure Shift, and an alternative method of precise entry in the same context in the article on OTE. A starter exercise: scroll through the last 30 days of the ETH chart on M15 and find every MSS after a sweep. Check in how many cases the breaking leg left a breaker with an overlapping FVG — and what price did on the first retest of that zone. That one session with history will teach you more than a dozen videos about unicorns.
FAQ
What is the ICT Unicorn Model?
Why is it called the Unicorn?
What timeframe should you use for the Unicorn Model?

Trader and founder of Strefa Tradingu. He’s been breaking crypto down on YouTube for years — no hype, no signals, with a focus on market structure and risk management.
🎁 Grab Strefa’s free TradingView indicators
Drop your email — we’ll send you links to our free TradingView indicators plus a no-fluff starter kit. Zero spam.
You’re joining the Strefa Tradingu list. Unsubscribe with one click, anytime.Check your inbox (and the Spam/Promotions folders) and add us to your contacts.